How to Grow Microgreens Indoors for Beginners
Learning how to grow microgreens indoors for beginners is one of the most rewarding ways to start your indoor gardening journey. These tiny, nutrient-packed greens are incredibly easy to cultivate, require minimal space, and can be harvested in just 1-2 weeks. Whether you live in a small apartment or simply want fresh greens year-round, microgreens offer a simple solution that even complete beginners can master.
Microgreens are young vegetable and herb seedlings that are harvested when they develop their first set of true leaves. Unlike their mature counterparts, these miniature plants pack an incredible nutritional punch, often containing 4 to 40 times more vitamins, minerals, and antioxidants than full-grown vegetables. The best part? You don’t need a green thumb or expensive equipment to get started.
What You Need to Get Started
Before diving into the growing process, let’s gather the basic supplies. The good news is that you probably already have some of these items at home, and the rest are affordable and easy to find.
1. Essential Supplies for Beginners
Before you plant your first seed, you’ll need to gather a few basic supplies. The good news is that microgreens don’t require expensive equipment or a lot of space, most beginners can get started with items they already have at home or can pick up for under $20. From simple containers to the right type of seeds, having the proper supplies on hand will set you up for success and make your first growing experience smooth and enjoyable.
- Growing Containers: You can use almost any shallow container with drainage holes. Seed starting trays work great, but you can also repurpose plastic takeout containers, berry boxes, or even egg cartons. Just poke a few holes in the bottom for drainage. For personal-sized batches, 8oz deli containers are perfect for beginners.
- Growing Medium: You have two main options here. The first is soil, specifically seed starting mix or organic potting soil without added fertilizers. Fill your container with about 2 inches of soil, this is plenty since microgreens don’t develop deep root systems. The second option is soilless growing mats made from hemp, coconut coir, or jute. These are cleaner and work well for beginners who want to avoid mess.
- Seeds: Look for seeds specifically labeled as microgreen or sprouting seeds. While you can use regular vegetable seeds, microgreen varieties are often more affordable and come in larger quantities. Beginner-friendly options include broccoli, kale, radish, pea shoots, and arugula. These germinate quickly and are forgiving if you make mistakes.
- Water and Spray Bottle: A simple spray bottle is essential for keeping your seeds moist without disturbing them. As your microgreens grow, you can switch to bottom watering by placing your container in a tray of water.
- Light Source: A sunny windowsill that gets 4-6 hours of direct sunlight works perfectly. If you don’t have adequate natural light, basic LED grow lights are affordable and effective. Position them 2-4 inches above your trays for best results.
2. Optional Tools Worth Considering
While not strictly necessary, a few additional tools can make your microgreen growing experience smoother and more enjoyable. A small fan helps improve air circulation and prevents mold issues, especially in humid environments. A kitchen scale is useful for measuring seed quantities accurately, ensuring consistent results batch after batch.
A seed shaker or spice jar with large holes makes spreading seeds evenly much easier than using your hands alone. Some growers also invest in a pH testing kit to check their water quality, as extremely hard or soft water can affect germination rates. These extras aren’t required for your first grow, but they’re worth considering as you get more serious about indoor gardening.
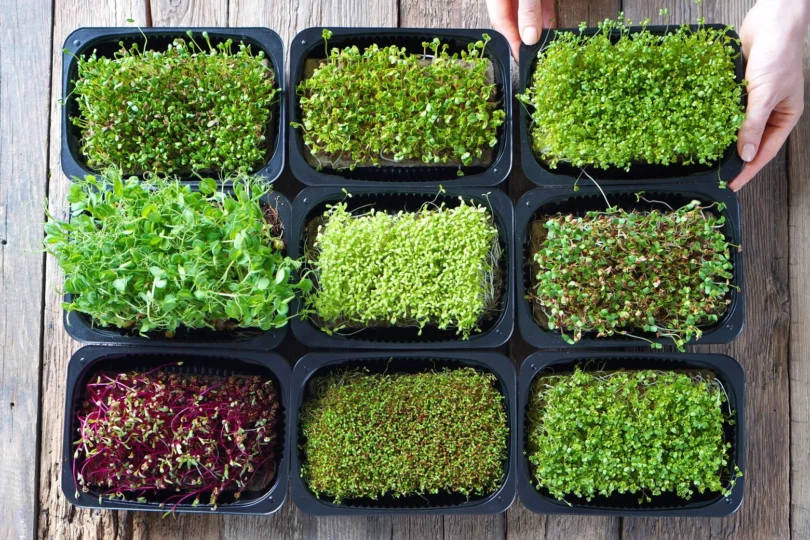
Choosing the Best Microgreens for Beginners
Not all microgreens are created equal when it comes to ease of growing. Some varieties are practically foolproof, while others require more attention and specific conditions.
1. Easiest Varieties to Start With
Not all microgreens grow at the same speed or difficulty level, which is why picking the right varieties can make or break your first experience. As a beginner, you want to start with forgiving plants that germinate quickly, tolerate minor mistakes, and deliver satisfying results in just a week or two. The varieties listed below are specifically chosen for their reliability and ease of growing, giving you the best chance of success while you learn the basics of indoor microgreen gardening.
- Pea Shoots: These are arguably the easiest microgreens for beginners. They grow quickly, produce substantial yields, and have a mild, sweet flavor that tastes like fresh peas. They also tolerate cooler temperatures better than many other varieties.
- Broccoli: Broccoli microgreens are incredibly popular because they’re packed with sulforaphane, a compound known for its potential cancer-fighting properties. They germinate reliably within 2-3 days and have a mild, slightly peppery flavor that works well in almost any dish.
- Radish: If you want fast results, radish microgreens are your best bet. They often sprout within 24-48 hours and are ready to harvest in just 5-7 days. They add a spicy kick to salads and sandwiches.
- Kale: Another nutrient-dense option that’s perfect for beginners. Kale microgreens have a milder flavor than mature kale and grow reliably without fuss.
- Arugula: These grow incredibly fast, often ready to harvest in under a week. They have that signature peppery bite that arugula lovers crave.
2. Varieties to Avoid as a Beginner
While sunflower shoots are delicious and popular, they’re better suited for growers with a bit of experience. They require soil for germination and need their hulls removed, which adds complexity. Similarly, beets and chard can be trickier because their seeds are actually seed clusters that produce multiple seedlings, making spacing more challenging.
Step-by-Step Growing Process
Now that you have your supplies and seeds, let’s walk through the entire process from seed to harvest.
1. Prepare Your Seeds
Many seeds benefit from pre-soaking to speed up germination. Place your seeds in a jar or bowl and cover them with water for 6-8 hours. This step isn’t absolutely necessary, especially for small seeds like mustard or arugula, but it can significantly speed up the process for larger seeds like peas, sunflowers, and beets. After soaking, drain the water thoroughly.
2. Prepare Your Growing Container
If you’re using soil, fill your container with about 2 inches of moistened seed starting mix. You want the soil damp but not soggy. If you’re using a growing mat, soak it thoroughly in water and place it in your container. The mat should be quite wet but not sitting in standing water.
3. Sow Your Seeds
Spread your seeds evenly across the surface of your soil or mat. Unlike traditional gardening, you want to sow microgreen seeds quite densely, almost like you’re sprinkling salt on food. A thick, even layer ensures a good harvest. For a standard 5×7 inch container, about 2 tablespoons of seeds is usually perfect.
After spreading the seeds, give them a gentle press into the growing medium. If using soil, sprinkle a very thin layer of additional soil over the top, just enough to cover the seeds. This helps with germination and keeps the seeds in place.
4. The Blackout Period
Cover your container with a lid, plastic wrap, or another tray to create a dark, humid environment. This “blackout” period mimics the seeds being underground and encourages them to germinate and stretch upward looking for light. Place the covered container in a warm spot, ideally between 65-75°F.
Check daily for germination. Most seeds will sprout within 2-5 days. You’ll see tiny white roots and stems pushing through the soil. If you notice any white fuzzy growth, don’t panic, this is usually just root hairs and is completely normal.
5. Uncover and Provide Light
Once most seeds have sprouted and are about half an inch tall, remove the cover and move them to your light source. If using a window, rotate the container daily so all sides get equal light. If using grow lights, keep them on for 12-16 hours per day.
6. Water Daily
Microgreens need consistent moisture to thrive. Use your spray bottle to mist them morning and evening, keeping the growing medium moist but not waterlogged. Once the roots are established, you can bottom water by placing the container in a tray of water for a few minutes, then draining excess water.
7. Harvest and Enjoy
Your microgreens are ready to harvest when they develop their first set of true leaves, typically 7-14 days after planting depending on the variety. The true leaves look like miniature versions of the mature plant’s leaves, different from the initial seed leaves.
To harvest, simply snip the stems just above the soil line or growing mat using clean scissors. Harvest only what you need for each meal, as microgreens keep growing until you cut them. If you must store them, place them in a sealed container with a damp paper towel in the refrigerator for up to a week.
Troubleshooting Common Problems
Even with the best care, beginners sometimes encounter issues. Here are solutions to the most common problems.
1. Leggy, Spindly Growth
If your microgreens are tall and thin with pale stems, they’re not getting enough light. Move them closer to your light source or increase the duration of light exposure. Leggy microgreens are still edible but may have less flavor and nutrition.
2. Mold or Fungus
White fuzzy mold can appear if the environment is too humid or if seeds are overcrowded. Ensure good air circulation by using a small fan nearby, and avoid overwatering. If you see actual mold (usually gray or black), it’s best to discard that batch and start fresh with better spacing.
3. Uneven Germination
This usually happens when seeds aren’t spread evenly or when the container isn’t level. Next time, take extra care to distribute seeds uniformly. You can also try soaking seeds beforehand to encourage more consistent sprouting.
4. Slow Growth
If your microgreens seem to be taking forever, check the temperature. Most varieties prefer temperatures between 65-75°F. If your growing area is cooler, consider using a seed starting heat mat to speed things up.
Creative Ways to Use Your Microgreens
Now that you’ve successfully grown your first batch, you might be wondering how to incorporate them into your meals. The possibilities are nearly endless.
- Salads and Bowls: Add a handful of microgreens to any salad for a nutritional boost and flavor punch. They pair beautifully with grain bowls, Buddha bowls, and poke bowls.
- Sandwiches and Wraps: Replace or supplement lettuce with microgreens in sandwiches, wraps, and tacos. Radish and mustard microgreens add a spicy kick that elevates any sandwich.
- Soups and Stews: Garnish hot soups with microgreens just before serving. The heat will slightly wilt them, releasing their flavors while maintaining texture.
- Smoothies and Juices: Blend mild microgreens like pea shoots or broccoli into your morning smoothie. You’ll get the nutrition without a strong vegetable taste.
- Eggs and Avocado Toast: Top scrambled eggs, omelets, or avocado toast with microgreens for an Instagram-worthy breakfast that tastes as good as it looks.
Frequently Asked Questions (FAQ)
Starting something new always brings questions, and growing microgreens indoors is no exception. Beginners often wonder about timing, costs, equipment needs, and what to do when things don’t go as planned. This section covers the most common questions that come up when learning how to grow microgreens indoors for beginners, giving you clear answers so you can grow with confidence and avoid the typical pitfalls that trip up first-time growers.
1. How long do microgreens take to grow?
Most microgreens are ready to harvest within 7-14 days from planting. Fast-growing varieties like radish and arugula can be ready in as little as 5-7 days, while slower varieties like beets might take up to 21 days.
2. Are microgreens healthier than regular vegetables?
According to nutritional research, microgreens often contain significantly higher concentrations of vitamins, minerals, and antioxidants compared to their mature counterparts. Some studies suggest they can have 4 to 40 times the nutrient density, meaning a small handful of microgreens can provide nutrition comparable to much larger portions of mature vegetables.
3. Can I grow microgreens without soil?
Absolutely! Many beginners prefer growing microgreens on hydroponic mats made from coconut coir, hemp, or jute. These soilless methods are cleaner and work well for most varieties. However, some seeds like sunflower shoots prefer soil for better germination.
4. Do I need special lights to grow microgreens?
While a sunny windowsill works for many beginners, grow lights give you more consistent results and allow you to grow year-round regardless of weather. Basic LED grow lights are affordable and energy-efficient, making them a worthwhile investment if you plan to grow regularly.
5. How much does it cost to start growing microgreens?
Getting started is surprisingly affordable. A basic setup with seeds, a growing container, and soil can cost under $20. If you want to invest in grow lights and proper trays, expect to spend around $50-100 for a complete beginner setup that will last for many growing cycles.
6. Can I reuse the soil after harvesting?
It’s not recommended to reuse soil for microgreens because the dense planting and quick harvest don’t allow for proper nutrient cycling. However, you can compost the used soil and growing mats, or add them to your garden soil to improve organic matter.
7. Why are my microgreens falling over?
This could be due to insufficient light, overwatering, or damping off disease. Ensure they’re getting adequate light and that you’re not keeping the growing medium too wet. Good air circulation also helps prevent fungal issues that can cause seedlings to collapse.
Start Your Microgreen Journey Today
Learning how to grow microgreens indoors for beginners opens up a world of fresh, nutritious eating right from your kitchen counter. With minimal investment, space, and time, you can harvest your own superfood greens in just a matter of days. The process is forgiving enough for complete beginners yet engaging enough to keep experienced gardeners coming back for more.
Start with easy varieties like broccoli or pea shoots, follow the simple steps outlined above, and you’ll be enjoying homegrown microgreens on your salads, sandwiches, and smoothies within two weeks. Once you get the hang of it, experiment with different varieties and growing methods to find what works best for your space and taste preferences. Happy growing!